Read Without Distractions with iPhone’s Reader Feature

We hate them: Chunky headlines, brand logos, annoying ads or social media widgets. As much as we sometimes like viral content or funny ads, we really just want to read an online article without all the unnecessary clutter. Thankfully your default browser on your IPhone, Safari, contains a killer feature that does just that.

Since iOS 5, Apple has introduced a Reader feature on its Safari browser on iPhone and iPad. Though it’s been a few years, this killer feature has gone unnoticed because it’s located at the top of Safari browser and as soon as you scroll downwards, it disappears. In earlier iOS 5 & 6 versions, it used to be an icon that said ‘Reader’ at the right top. From iOS 7 onwards, Apple has made it into a tiny inconspicuous icon at the top left corner.

To use the Reader feature, simply click on the Reader icon at the left top corner, beside the address bar. If you don’t see it, make sure you scroll all the way to the top of the page.

iPhone Reader Feature (Before)

In IOS 7, the Reader feature icon is located at the top left corner beside the URL input field.


Once actviated,  Safari immediately strips away all unnecessary clutter,  enlarges your text to fill the whole screen, displays it in a clean and neat black & white format. The images in the article also stay in-tact. To view the page again in its original format, just click on the Reader icon to revert back.

iPhone Reader Feature (After)

After clicking on Reader, your article is shown in a clean, easy-to-read format. Read with no more distractions!


Besides the iPhone, this Reader feature is also available on Safari for iPad and Mac OS X too.

Safari OS X Reader Feature

Safari on Mac OS X also supports Reader feature. Located at the top right, to the right of the address bar

Reader feature on Safari Mac OS X

After activating Reader feature on Safari browser on Mac OS X


Killer Shortcuts: Dock Windows Side By Side

Have you ever needed to compare the content of 2 Windows and just used the Alt + Tab  shortcut in Windows to constantly swap to and fro? Or perhaps, you had to manually use your mouse to drag the corners of the 1st window to fit nicely on the left and then drag the other window to fit on the right. Thankfully, there’s a power shortcut key in Windows 7 and later versions that lets you dock Windows side by side within seconds: Windows Key + Left / Right Arrows

How-To:

Simply, select one window and  press Windows Key + Left Arrow  to dock the window to the left. And for the 2nd window, just press Windows Key  + Right Arrow. And abacadabra, you get windows perfectly docked side by side!

So below, you see Windows all over the place  and want it docked nicely.

Before


Assuming I want my web browser on the left, so I select it and press Windows Key + Left Button. And for my Word processor window, I want it on my right, so I just press Windows Key + Right Arrow. And there you have it, beautifully docked windows side by side. You can read content on your web browser while writing notes down in your Word file. You can use this powerful feature to compare pdf files, excel files or even surf the web while keeping a video window open at the side too.


After

This current shortcut only works for Windows. For Mac users, there’s no such power shortcut in Mac OS, but because I love this feature so much. I’ve managed to find an equivalent app that simulates the shortcut key feature for Mac OS. It’s  called ShiftIt. Just download and install it. I personally use it and it works perfectly.

If you’re curious to also explore the power of the Windows key, here are some other power shortcuts that I use all the time.

  • Win Key + Up Arrow = Maximize Window
  • Win Key + Down Arrow = Minimize Window
  • Win Key  + M = Show Desktop


The 1st Thing to Do When You Buy a New PC

It’s always a joy when you get your hands on a brand new computer or upgrade to a new cutting edge OS. But it also means the hassle of downloading individual software and installing them one by one. If you’re like me and use all types of  software, this process of clicking next-next-next on installation wizards could take hours. But fret not, there’s an app that lets you bulk-install applications which I discovered years ago. It’s called Ninite.

Ninite

In a nutshell, Ninite consolidates the most popular free applications and lets you download it in a single installer file. This saves you time and effort from the traditional way of downloading and installing one by one.

So how does Ninite work? It’s really super duper simple.

Step 1: Select all the apps you want and click ‘Get Installer
(*Note: If you’re clueless about which to select, scroll to the bottom of the post where I will recommend my fav apps)

Install Ninite Step 1

Step 2:  Download the file

Ninite Install Step 2

Step 3: Run the file, sit back and let the magic unfold.

Perhaps you could go have a shower, and when you’re back, everything will be installed. It’s really that simple!

At the moment, Ninite supports Windows and Linux. I’ve been searching for a Ninite equivalent for Mac OS, but to no avail. So yes, Windows and Ubuntu users, you are one lucky bunch of people!

The official website for Ninite is http://www.ninite.com


Additional Information: Apps that I personally use and recommend

WEB BROWSERS:

  • Chrome (ease-of-use, speed, extensions),
  • Firefox (access to ton of add-ons, personal privacy and away from pryng eyes of Google),
  • Opera (Opera was once the king of speed & usability in the early and mid 2000s before Google introduced Chrome in 2008)

MESSAGING: Skype, Google Talk

COMPRESSION: Winrar

MEDIA

  • iTunes (for Mac devices)
  • VLC (the best free video and multimedia player in the market)
  • Winamp (I’ve been using Winamp since 1999 and still love it because it uses the least memory & system resources, compared to any other music player the past 15 years)
  • Audacity (the best free open-source music editor software for recording , editing, mixing)
  • K-Lite Codecs (all the necessary video codecs you ever need to run your videos smoothly)

RUNTIME: Java, NET, Silverlight, Air

ONLINE STORAGE: Dropbox, Google Drive

IMAGING

  •  Picasa (The most intuitive, easy-to-use  application for organizing, editing your photos.You can easily favourite photos by “Starring” them by pressing the space button. Then, easily select these Starred photos and directly upload to Facebook or other social media. For Photoshop-phobic people, Picasa has a host of easy-to-use picture editing features  extremely simple and if you’re lazy, you would probably love “I’m Feeling Lucky” edit feature that is a one-click fix for your image lighting and colour. Lastly, I also like the Export function that lets you select one or more pictures, easily bulk-resize them or add watermark captions all at once)
  • GIMP (the best open-source alternative to Adobe Photoshop)

DOCUMENTS

  • OpenOffice (open-source alternative to Microsoft Office),
  • Reader (to read PDF files)

SECURITY

  • Avast (reliable & light on system resources) ,
  • MalWareBytes (effective malware, rootkit protection)

DEVELOPER TOOLS

  • Python, 
  • FileZilla (for web developers who use WS FTP),
  • Notepad++, 
  • JDK, 
  • Eclipse (for Android development)

These are the applications that I have been using for many years. If you’re not a developer,  you can ignore the ‘Developer Tools’ section, but definitely consider downloading all the others that I suggested.

And that’s all for the 2nd post of Tech Kung Fu. Hope you enjoyed today’s killer tip and feel free to share. Chop by chop, you’re on your way to becoming a kung fu tech master!

How to Protect Your Privacy from Third-Party Trackers

In today’s Web 3.0 world, our every move on the Internet is monitored and tracked. It is already scary that tech behemoths like Facebook and Google hold an abundant amount of your private information. But did you know that, advertisers and sneaky data collection companies are also building a wealth of your personal information too?

Ask any Internet marketer and he’ll reveal to you that there are countless online tools that collect your data in real-time.  Nowadays, many companies embed third-party trackers into their sites. These trackers monitor your surfing behavior through your IP address, cookies,  the time & duration you spend on websites and of course, through the social media that we are logged into while we simultaneously surf the web.

Sometimes, such information is collected for data analytics, which lets companies better customize & enhance your experience on their websites. Often though, the data collected about you is sold to advertisers who are able to effectively target you with advertisements. According to DoNotTrackMe, an average web user gets tracked more than a hundred times whenever he surfs the Web.

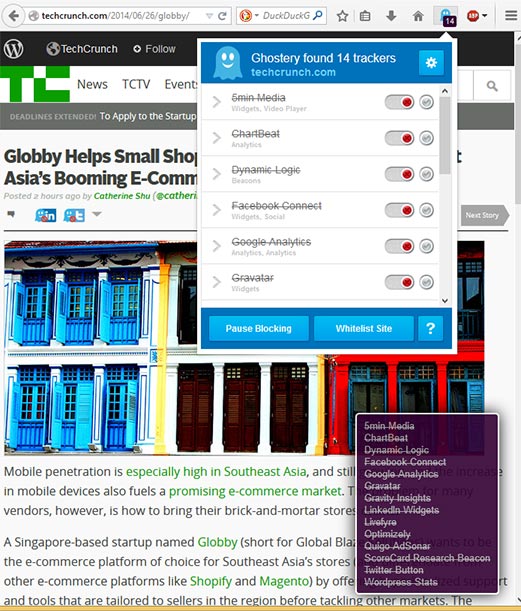
Let’s take for example, a very popular site these days: Business Insider. A simple analysis by Ghostery (which I’ll elaborate later in the article) shows that one single  Business Insider page contains 14  trackers (that come in the form of ads, widgets or analytics tools).

TechCrunch Ghostery Trackers


Thankfully, some browser add-ons have emerged to help identify and block ad trackers. The most famous and reliable ones have been Ghostery and DoNotTrackMe. And even more recently, all the top anti-virus software such as Avast or AVG  have also incorporated such features in their premium versions too.

For your easy access, I’ve included the links for Ghostery and DoNotTrackMe installation links for Chrome and Firefox.

1. Ghostery (Chrome extension, Firefox add-on) or
2. DoNotTrackMe (Chrome extension , Firefox add-on)

Personally, I’ve used Ghostery for about a year now and it works fine for me. It has grown into a cult-like status amongst privacy enthusiasts and for good reason. Its user interface is very intuitive and simple-to-use. When you first install the add-on, Ghostery will guide you through simple steps.

But if I were to sum up the most important points, just know:

  • Whenever you surf any website, the Ghostery icon (at the right top corner of your browser) will indicate the trackers on every website. You can choose which tracker to allow or block.
  • By default, all the blockers and cookies are allowed.
  • If you are someone who just wants to be on the safe side, you can just go straight into the options and block all trackers and all cookies*:

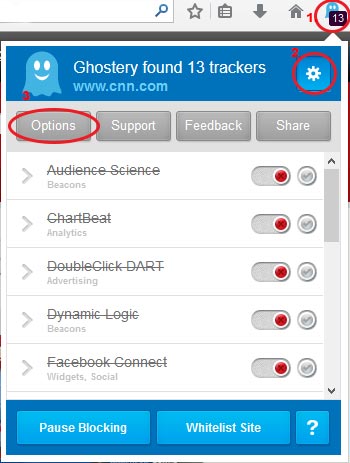
STEP 1: Click at the Ghostery icon on the right top, and the Ghostery menu will drop down. Click on the gear icon and then click on ‘Options

Ghostery Right Top Corner

STEP 2: Scroll down to “Blocking Options” and under “Trackers” click on “Select All” option to block all trackers and click on “Save”

Block all Trackers and Cookies

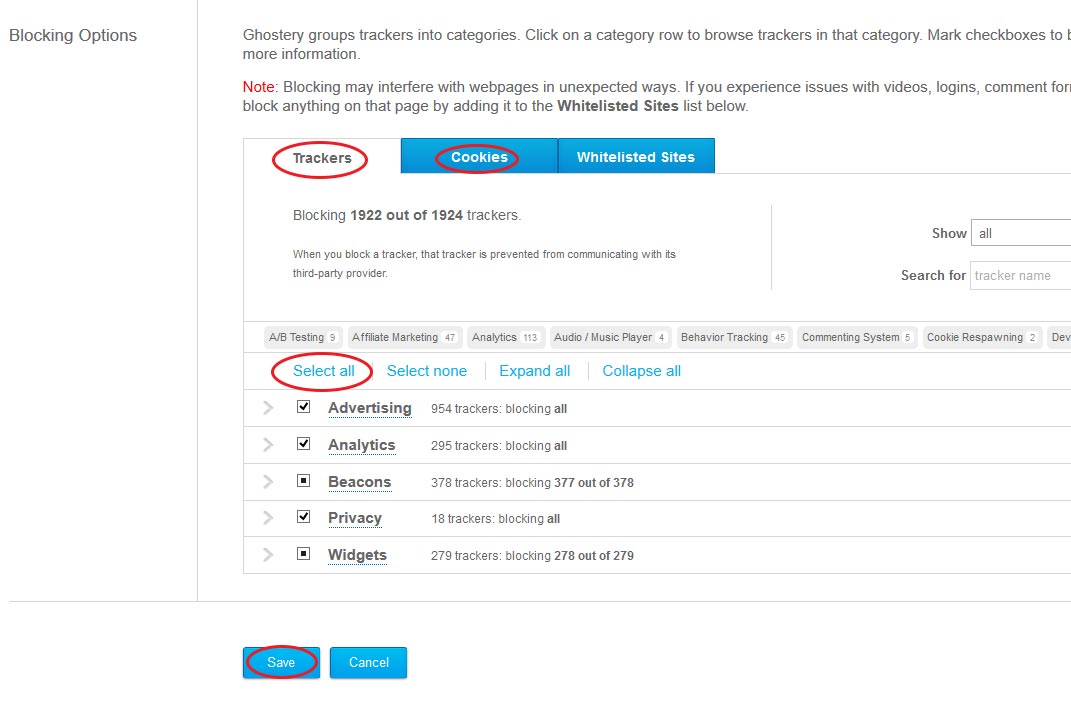
STEP 3: Click on  “Cookies” tab and also click on “Select All” and “Save”

*However, do note that this is only for those who are super uptight about their privacy. For the typical web user who likes to interact with people on websites through comments or view embedded multimedia, you should probably choose to allow some social widgets like “Facebook Connect“,  “Facebook Social Plugins“, “Disqus”, “Soundcloud”.

As you start surfing the web after installing Ghostery,  there might be some occasions that you aren’t able to properly  view some sites. In such situations, Ghostery is most probably blocking an essential tracker. So, just use your discretion to “Allow” the relevant tracker. For example, I had to Allow “Zopim” when I used a real-time customer service chat for a website I was on.

In conclusion, I believe that as you start using such browser add-ons like Ghostery or DoNotTrackMe, you will begin to understand the gargantuan magnitude of how much information is collected about us everytime we surf. It is impossible to protect your privacy totally as a normal Internet user without much tech skills, but thanks to such add-ons, you are at least able to minimize privacy intrusion with just a few simple steps.

Thank you and hope you enjoyed this first post on Tech Kung Fu.

Copyright © 2014  Tech Kung Fu by DJPANG

Hello world!

Like the birth of any new blog, there needs to be a customary “Hello World” post. I’ll just briefly share the objective of this blog. My main motivation for starting this blog up is to share tech tips with people, especially within the sphere of online security and privacy. I also hope to share fun tips on a wider gamut topics too, such as productivity tips and tools to help you become a savvy kung fu master in technology.